This post was originally written for my colleagues to give insight into the UX team’s process.
A challenge we face when designing a new interface is how to “show” the interactions and animations that bring our designs to life in an effective way. The static .psd mocks and wireframes in which we used to rely are no longer good enough. The screens we design now need to adapt to multiple resolutions, be tapped, pinched, swiped, zoomed, and more. Our interfaces must be alive, transitional and reactive to fingers.
The ‘Traditional’ process
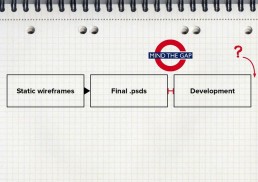
Before incorporating prototyping the process looked something like this:
- The designer would create every state possible in pixel perfection along with some annotations of how it was meant to work.
- The designs would then be passed over to the developers to interpret and develop.
- The final product was produced and tested in context. Any design related bugs were scheduled for the next release.
This process worked but static images often leave gaps communication. These gaps resulted in lots of back and forth questioning, missing details and misinterpretation, which is bad. Another issue was that static image files aren’t good indicators of what a design’s going to be like to actually use – especially in the context of multiple devices. Something could look great in Photoshop but be difficult to use on a small mobile screen and we wouldn’t find out until it was too late. We realised there had to be another way. And that’s when prototyping entered our workflow.
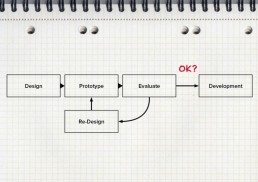
Including prototyping into our workflow
A prototype is a representative model of the final system and can range from rough paper sketches to interactive simulations that look and function like the final product. Unlike static .psds and annotations, prototypes go further than show and tell – they actually let you experience the design. All the time and frustration spent trying to communicate interactions can be cut out by simply showing what you mean. If a picture is worth a thousand words, then a prototype is worth ten thousand.
It’s early days but, so far, we’ve found incorporating prototyping into our workflow to be very beneficial. Here are some of the key benefits:
- Quick iterations. Design is an iterative process. Prototyping allows us to experiment with and review multiple approaches and ideas quickly.
- Designs can be tested in context. Experiencing user-flows on the right device lets us see first hand what works and what doesn’t before committing to a design.
- Catch mistakes early. Prototyping helps catch mistakes early in the design process before they are passed onto development.
- Focus. Prototyping produces more focused products by concentrating on the user-flow rather than just the visual design.
- Reduces misinterpretation. Prototypes let people experience how a product will work, rather than just read about it. Words leave too much room for misinterpretation.
- Reduces risk. All the above reduces risk and avoids missed requirements, leading to a better design faster.
Different types of prototype
Broadly speaking, you can class prototypes into one of the fidelity categories below. Fidelity refers to how closely a prototype resembles the final solution. The fidelity we use depends on the stage of the design process and the goals of the prototype.
Conclusion
Hopefully, this article has helped you understand more about prototyping and the benefits it can bring to the design and development workflow. We still use Photoshop but not until much later on in the design process.
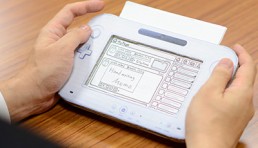
Low fidelity prototypes
Low fidelity prototypes are really quick. Not designed to wow people but to depict and explore concepts and flow options. By removing the bells and whistles associated with high-fidelity prototypes, we strip our concept down to the core. Users aren’t distracted by the visual design and more focused on the core interactions/flows.
Medium fidelity
Medium fidelity prototypes take more time and effort but look more formal and refined. They’re better suited for testing in context to determine whether user needs are met and whether the user experience is optimal in the different contexts. You deliberately don’t want it to look too polished though as you’re not after feedback on the visual design at this stage (debating over button colour) but on the actual user flow and experience – ie. How easy it is to accomplish a task? People also tend to find it easier to give feedback on something that’s clearly still a work in progress.

High-fidelity
High–fidelity prototypes are the most realistic and can sometimes be mistaken for the final product. They are usually time-intensive to produce but they’re good for getting a true sense of how a design will work and making the final refinements.

Conclusion
Hopefully, this article has helped you understand more about prototyping and the benefits it can bring to the design and development workflow. We still use Photoshop but not until much later on in the design process.